|
|
一、简介
1.ELK介绍
ELK Stack 是 Elasticsearch、Logstash、Kibana 三个开源软件的组合。在实时数据检索和分析场合,三者通常是配合共用,而且又都先后归于 Elastic.co 公司名下,故有此简称。
ELK Stack 在最近两年迅速崛起,成为机器数据分析,或者说实时日志处理领域,开源界的第一选择。
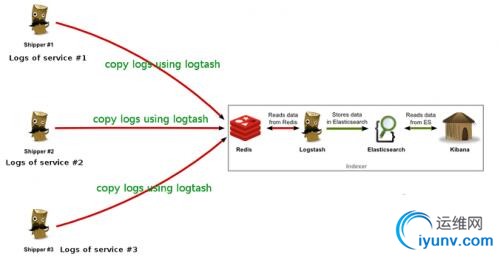
ELK由三个组建构成:
- Elasticsearch,负责数据的索引和存储
- Logstash ,负责日志的采集和格式化
- Kibana,负责前端统计的展示
大致的架构如下:


二、logstansh安装
1.同步时间
1
2
| [iyunv@ELK-16 ~]# yum install -y ntpdate
[iyunv@ELK-16 ~]# echo '*/5 * * * * * /usr/sbin/ntpdate us.pool.ntp.org' >> /var/spool/cron/root
|
2.JDK安装
1
2
3
4
5
| [iyunv@ELK-16 ~]# yum install -y java-1.8.0
[iyunv@ELK-16 ~]# java -version
openjdk version "1.8.0_101"
OpenJDK Runtime Environment (build 1.8.0_101-b13)
OpenJDK 64-Bit Server VM (build 25.101-b13, mixed mode)
|
3.logstansh安装
1
2
3
4
5
| [iyunv@ELK-16 ~]# wget https://download.elastic.co/logs ... gstash-2.3.4.tar.gz
[iyunv@ELK-16 ~]# tar xf logstash-2.3.4.tar.gz
[iyunv@ELK-16 ~]# mv logstash-2.3.4 /usr/local/
[iyunv@ELK-16 ~]# echo "PATH=$PATH:/usr/local/logstash-2.3.4/bin" >> /etc/profile
[iyunv@ELK-16 ~]# source /etc/profile
|
4.新建 logstansh配置文件目录
1
| [iyunv@ELK-16 ~]# mkdir /usr/local/logstash-2.3.4/conf
|
5.测试logstansh
1
2
3
| [iyunv@ELK-16 ~]# logstash -e "input {stdin{}} output {stdout{}}"
Settings: Default pipeline workers: 4
Pipeline main started
|
三、Redis安装
1
2
3
4
5
6
7
8
9
10
| 1.redis安装
[iyunv@ELK-16 ~]# wget http://download.redis.io/releases/redis-2.8.20.tar.gz
[iyunv@ELK-16 ~]# yum install tcl gcc gcc-c++ -y
[iyunv@ELK-16 ~]# tar xf redis-2.8.20.tar.gz
[iyunv@ELK-16 ~]# mv redis-2.8.20 /usr/local/
[iyunv@ELK-16 ~]# cd /usr/local/redis-2.8.20/
[iyunv@ELK-16 redis-2.8.20]# make MALLOC=libc
[iyunv@ELK-16 redis-2.8.20]# make install
[iyunv@ELK-16 redis-2.8.20]# cd utils/
[iyunv@ELK-16 utils]# ./install_server.sh #选项默认,一直回车
|
2.查看redis的监控端口
1
2
3
| [iyunv@ELK-16 utils]# netstat -tnlup | grep redis
tcp 0 0 0.0.0.0:6379 0.0.0.0:* LISTEN 3015/redis-server *
tcp 0 0 :::6379 :::* LISTEN 3015/redis-server *
|
3.测试redis是否缓存数据
a.新建logstansh配置文件如下
1
2
3
4
5
6
7
8
9
10
| [iyunv@ELK-16 ~]# cat /usr/local/logstash-2.3.4/conf/output_redis.conf
input { stdin { } } #手动输入数据
output {
stdout { codec => rubydebug } #页面debug信息
redis {
host => '127.0.0.1'
data_type => 'list'
key => 'redis'
}
}
|
4.启动logstansh
1
| [iyunv@ELK-16 ~]#logstash -f /usr/local/logstash-2.3.4/conf/output_redis.conf --verbose
|
5.查看redis中是否有数据
1
2
3
4
5
| [iyunv@ELK-16 ~]# cd /usr/local/redis-2.8.20/src/
[iyunv@ELK-16 src]# ls
adlist.c crc64.o lzfP.h rdb.o rio.o t_hash.o
adlist.h db.c Makefile redisassert.h scripting.c t_list.c
adlist.o db.o Makefile.dep redis-benchmark scripting.o t_list.o
|
四、elasticsearch安装
1.elasticsearch安装
修改elasticsearch配置文件
1
2
3
| [iyunv@ELK-16 ~]# vim /usr/local/elasticsearch-2.3.4/config/elasticsearch.yml
把下面参数的注释去掉并改成服务器IP。这里只做简单安装,优化及集群后面再介绍
network.host: 192.168.16.177
|
2.elasticsearch启动
1
2
3
4
| [iyunv@ELK-16 ~]# useradd elk
[iyunv@ELK-16 ~]# su elk
[elk@ELK-16 ~]$ chown -R elk.root /usr/local/elasticsearch-2.3.4/
[elk@ELK-16 ~]$ /usr/local/elasticsearch-2.3.4/bin/elasticsearch -d
|
查看是否启动
1
2
3
4
5
| [elk@ELK-16 local]$ netstat -tnlup | grep java
(Not all processes could be identified, non-owned process info
will not be shown, you would have to be root to see it all.)
tcp 0 0 ::ffff:192.168.16.177:9200 :::* LISTEN 2192/java
tcp 0 0 ::ffff:192.168.16.177:9300 :::* LISTEN 2192/java
|
3、测试logstansh和elasticsearch是否能结合使用
新建logstansh配置文件elasticsearch.conf
1
2
3
4
5
6
| [iyunv@ELK-16 conf]# cat /usr/local/logstash-2.3.4/conf/elasticsearch.conf
input { stdin {} } #手动输入
output {
elasticsearch { hosts => "192.168.16.177" }
stdout { codec=> rubydebug } #页面debug信息
}
|
启动elasticsearch.conf配置文件
1
| [iyunv@ELK-16 ~]#logstash -f /usr/local/logstash-2.3.4/conf/elasticsearch.conf --verbose
|
查看elasticsearch是否获取到了"hello elasticsearch"
1
2
3
4
5
6
7
8
9
10
11
12
13
14
15
| [iyunv@ELK-16 ~]# curl http://192.168.16.177:9200/_search?pretty
{
"took" : 1,
"timed_out" : false,
"_shards" : {
"total" : 0,
"successful" : 0,
"failed" : 0
},
"hits" : {
"total" : 0,
"max_score" : 0.0,
"hits" : [ ]
}
}
|
4、安装elasticsearch插件
elasticsearch有很多插件:http://www.searchtech.pro/elasticsearch-plugins
elasticsearch-head插件安装,若无法下载请至github下载,解压至/usr/local/elasticsearch-2.3.4/plugins/head目录中
1
2
| [iyunv@ELKServer lang-expression]# cd /usr/local/elasticsearch-2.3.4/bin/
[iyunv@ELKServer bin]# ./plugin install mobz/elasticsearch-head
|
1
2
3
4
5
6
| [iyunv@ELK-16 ~]# wget https://www.elastic.co/downloads/past-releases/kibana-4-5-2
[iyunv@ELK-16 ~]# tar xf kibana-4.5.2-linux-x64.tar.gz
[iyunv@ELK-16 ~]# mv kibana-4.5.2-linux-x64 /usr/local/
[iyunv@ELK-16 ~]# vim /usr/local/kibana-4.5.2-linux-x64/config/kibana.yml
修改kibana配置文件,把下面这行改成elasticsearc的访问路径
elasticsearch.url: "http://192.168.16.177:9200"
|
[iyunv@ELK-16 ~]#sh /usr/local/kibana-4.5.2-linux-x64/bin/kibana &
六、配置客户端传输日志到ELK(本机测试)
1.server端的logstash.conf的配置
1
2
3
4
5
6
7
8
9
10
11
12
13
14
15
16
| vim /usr/local/logstash-2.3.4/conf/redis_elasticserach.conf
input {
redis {
host => '192.168.16.177'
data_type => 'list'
port => "6379"
key => 'logstash:syslog_log'
type => 'redis-input'
}
}
output {
elasticsearch {
hosts => "192.168.16.177"
index => "logstash-%{+YYYY.MM.dd}"
}
}
|
2.client端的logstash.conf的配置
1
2
3
4
5
6
7
8
9
10
11
12
13
14
15
16
17
| vim /usr/local/logstash-2.3.4/conf/logstash_redis.conf
input {
file {
path => "/var/log/messages"
start_position => beginning
sincedb_write_interval => 0
add_field => {"Host"=>"192.168.16.177"}
type => "SYSLOG_LOG"
}
}
output {
redis {
host => "192.168.16.177:6379"
data_type => "list"
key => "logstash:syslog_log"
}
}
|
七、启动ELK各项服务
1
2
3
4
| logstash -f /usr/local/logstash-2.3.4/conf/logstash_redis.conf &
logstash -f /usr/local/logstash-2.3.4/conf/redis_elasticserach.conf &
/usr/local/elasticsearch-2.3.4/bin/elasticsearch -d #elk用户启动
/usr/local/kibana-4.5.2-linux-x64/bin/kibana &
|
八、查看
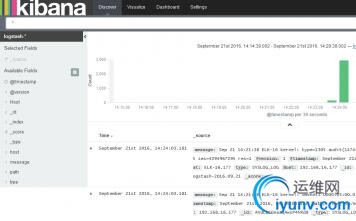
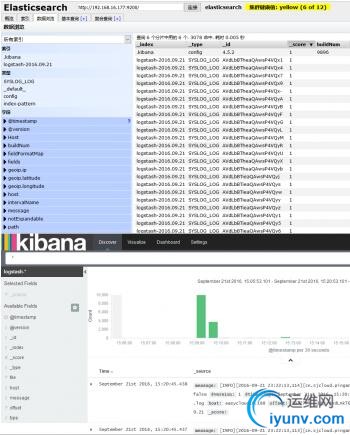
http://192.168.16.177:9200/_plugin/head/ 点击数据浏览


http://192.168.16.177:5601/ 点击Discover


九、配置客户端传输日志到ELK
1.server端创建证书
1
2
3
4
| [iyunv@ELK-16 ~]# cd /etc/pki/tls/
[iyunv@ELK-16 tls]# openssl req -subj '/CN=www.elk.com/' -x509 -days 3650 -batch -nodes -newkey rsa:2048 -keyout private/logstash-forwarder.key -out certs/logstash-forwarder.crt
[iyunv@ELK-16 tls]# scp certs/logstash-forwarder.crt 192.168.16.188:/etc/pki/tls/certs/
#在将logstash-forwarder.crt拷贝到client端
|
2.创建server端logstash.conf配置
1
2
3
4
5
6
7
8
9
10
11
12
13
14
15
16
17
18
| echo "192.168.16.177 www.elk.com" >> /etc/hosts
vim /usr/local/logstash-2.3.4/conf/logstash.conf
input {
file {
type => "syslog"
path => [ "/var/log/pacloud/pacloud.log" ]
}
lumberjack {
port => 5000
type => "logs"
ssl_certificate => "/etc/pki/tls/certs/logstash-forwarder.crt"
ssl_key => "/etc/pki/tls/private/logstash-forwarder.key"
}
}
output {
stdout { codec=> rubydebug }
elasticsearch {hosts => "192.168.16.177:9200" }
}
|
3.客户端安装
#注意两个配置文件:
配置文件 /etc/logstash-forwarder.conf
日志目录 /var/log/logstash-forwarder
1
2
3
4
5
6
7
8
9
10
11
12
13
14
15
16
17
18
19
20
21
22
23
24
25
26
| [iyunv@easycloud16 ~]# cp /etc/logstash-forwarder.conf /etc/logstash-forwarder.conf.bak
[iyunv@easycloud16 ~]# echo "192.168.16.177 www.elk.com" >> /etc/hosts
[iyunv@easycloud16 ~]# > /etc/logstash-forwarder.conf
[iyunv@easycloud16 ~]# vim /etc/logstash-forwarder.conf
{
"network": {
"servers": [ "www.elk.com:5000" ],
"ssl ca": "/etc/pki/tls/certs/logstash-forwarder.crt",
"timeout": 15
},
"files": [
{
"paths": [
"/var/log/pacloud/pacloud.log"
],
"fields": { "type": "syslog" }
}, {
"paths": [
"其他路径的文件"
],
"fields": { "type": "pacloud" }
}
]
}
|
注意:
一定要写域名,不能写server端的IP,因为写IP不能通过证书的认知
"ssl ca" 一定要正确写明路径
5.启动测试
服务端启动
1
2
3
| logstash -f /usr/local/logstash-2.3.4/conf/logstash.conf &
/usr/local/elasticsearch-2.3.4/bin/elasticsearch -d #elk用户启动
/usr/local/kibana-4.5.2-linux-x64/bin/kibana&
|

|
|