|
Docker 中的网络功能介绍 默认情况下,容器可以建立到外部网络的连接,但是外部网络无法连接到容器。 Docker 允许通过外部访问容器或容器互联的方式来提供网络服务 外部访问容器: 容器中可以运行一些网络应用,要让外部也可以访问这些应用,可以通过 -P 或 -p 参数来指定端口映射。 构建镜像模板 1) 创建一个sshd_dockerfile工作目录 1
2
3
4
5
| [iyunv@localhost ~]# mkdir sshd_dockerfile
[iyunv@localhost ~]# cd sshd_dockerfile/
[iyunv@localhost sshd_dockerfile]# touch dockerfile run.sh
[iyunv@localhost sshd_dockerfile]# ls
dockerfile run.sh
|
编辑run.sh文件 1
2
3
4
| [iyunv@localhost sshd_dockerfile]# cat run.sh
#!/bin/bash
/usr/sbin/sshd
/usr/sbin/httpd -DFOREGROUND
|
在主机上生成ssh秘钥对,并创建authorized_keys文件 1
2
3
4
5
6
7
| [iyunv@localhost sshd_dockerfile]# ssh-keygen -t rsa
Generating public/private rsa key pair.
Enter file in which to save the key (/root/.ssh/id_rsa):
Created directory '/root/.ssh'.
Enter passphrase (empty for no passphrase):
Enter same passphrase again:
[iyunv@localhost sshd_dockerfile]# cat ~/.ssh/id_rsa.pub > /root/sshd_dockerfile/authorized_keys
|
1
2
3
4
5
6
7
8
9
10
11
12
13
14
15
16
17
18
| [iyunv@localhost sshd_dockerfile]# cat dockerfile
FROM docker.wang.com/centos:centos7
MAINTAINER from cyh@example.com
RUN yum -y install openssh-server sudo httpd
RUN useradd admin
RUN echo "admin:admin" | chpasswd
RUN echo "admin ALL=(ALL) ALL" >> /etc/sudoers
RUN ssh-keygen -t dsa -f /etc/ssh/ssh_host_dsa_key
RUN ssh-keygen -t rsa -f /etc/ssh/ssh_host_rsa_key
RUN mkdir -p /var/run/sshd
RUN mkdir -p /home/admin/.ssh
RUN sed -ri 's/session required pam_loginuid.so/#session required pam_loginuid.so/g' /etc/pam.d/sshd
ADD authorized_keys /home/admin/.ssh/authorized_keys
RUN sed -ri 's/#ServerName www.example.com:80/ServerName www.benet.com/g' /etc/httpd/conf/httpd.conf
ADD run.sh /run.sh
RUN chmod 755 /run.sh
EXPOSE 22 80 443
CMD ["/bin/bash","/run.sh"]
|
二载入centos包 1
2
| [iyunv@localhost src]# docker load < centos7.tar
0fe55794a0f7: Loading layer [==================================================>]
|
1)在sshd_dockerfile目录下,使用docker build命令来创建镜像,注意:在最后还有一个”.”,表示使用当前目录中的dockerfile 1
2
3
4
5
6
7
| [iyunv@localhost sshd_dockerfile]# docker build -t centos:http .
Sending build context to Docker daemon 4.608 kB
Step 1 : FROM docker.wang.com/centos:centos7
---> 50dae1ee8677
Step 2 : MAINTAINER from cyh@example.com
---> Using cache
---> 62fedfca03bd
|
当使用–P(大写)标记时,Docker 会随机映射一个随机的端口到内部容器开放的网络端口。 注:-P使用时需要指定--expose选项或dockerfile中用expose指令容器要暴露的端口,指定需要对外提供服务的端口 使用 docker ps 可以看到,本地主机的32770被映射到了容器的22端口,本地主机的32769被映射到了容器的80端口,本地主机的32768被映射到了容器的443 端口。 1
2
3
4
5
| [iyunv@localhost sshd_dockerfile]# docker run -d -P centos:http
131e12661bc10f0bc441784d64e65038ac0263d6beff1d55bf2cd28d4082c948
[iyunv@localhost sshd_dockerfile]# docker ps
CONTAINER ID IMAGE COMMAND CREATED STATUS PORTS NAMES
131e12661bc1 centos:http "/bin/bash /run.sh" 22 seconds ago Up 21 seconds 0.0.0.0:32770->22/tcp, 0.0.0.0:32769->80/tcp, 0.0.0.0:32768->443/tcp trusting_rosalind
|
此时访问本机的 32770端口即可访问容器内 ssh 应用 1
2
3
| [iyunv@localhost sshd_dockerfile]# ssh admin@192.168.100.46 -p 32770
The authenticity of host '[192.168.100.46]:32770 ([192.168.100.46]:32770)' can't be established.
Are you sure you want to continue connecting (yes/no)? yes
|
注:192.168.1.102是宿主主机地址。 查看容器运行的httpd进程 1
2
3
4
5
6
7
| [admin@131e12661bc1 ~]$ pgrep httpd
7
8
9
10
11
12
|
此时访问本机的 32769端口即可访问容器内 web 应用 -p(小写)则可以指定要映射的端口,并且,在一个指定端口上只可以绑定一个容器。支持的格式有ip:hostPort:containerPort | ip::containerPort | hostPort:containerPort 注意: 容器有自己的内部网络和 ip 地址(使用 docker inspect 可以获取所有的变量。) -p 标记可以多次使用来绑定多个端口 1
2
3
4
5
6
| [iyunv@localhost sshd_dockerfile]# docker run -d -p 10111:22 -p 801:80 centos:http
e0c4edcb03ed524d6d9ebfeac62178761910719e3eac7f6e7058cf0e655e8636
[iyunv@localhost sshd_dockerfile]# docker ps
CONTAINER ID IMAGE COMMAND CREATED STATUS PORTS NAMES
e0c4edcb03ed centos:http "/bin/bash /run.sh" 16 seconds ago Up 15 seconds 443/tcp, 0.0.0.0:10111->22/tcp, 0.0.0.0:801->80/tcp grave_albattani
131e12661bc1 centos:http "/bin/bash /run.sh" 5 minutes ago Up 5 minutes 0.0.0.0:32770->22/tcp, 0.0.0.0:32769->80/tcp, 0.0.0.0:32768->443/tcp trusting_rosalind
|
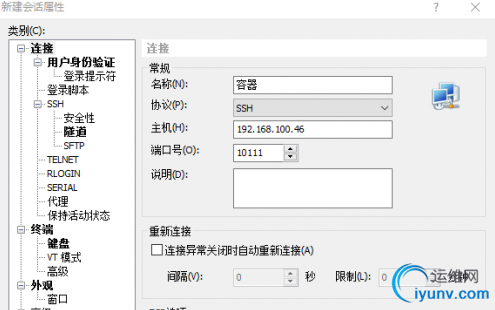
测试访问: 1) ssh测试: 使用xshell工具: 账号密码为 admin

测试web访问

映射到指定地址的指定端口 可以使用 ip:hostPort:containerPort 格式,指定映射使用一个特定地址,比如宿主机网卡配置的一个地址192.168.100.46 1
2
| root@localhost sshd_dockerfile]# docker run -dit -p 192.168.100.46:10112:22 -p 192.168.100.46:800:80 centos:http
fd41ea4d576f9a337df993b1e39db40274a16289eda134646abd385138216b0f
|
1. 映射到指定地址的任意端口 1
2
| [iyunv@localhost sshd_dockerfile]# docker run -d -p 192.168.100.46::80 --name webserver centos:http
c15abaf81039fb58f3104e7a8d6f854f640cc2ea8ed67615a8388866abf0c649
|
1 udp端口 1
2
| [iyunv@localhost sshd_dockerfile]# docker run -d -p 192.168.100.46:5000:5000/udp --name db4 centos:http
fadedde03f89a235e6cf7dd5412dba7a6870844625d498290126c05e68961335
|
1. 端口端口映射配置 1
2
| [iyunv@localhost sshd_dockerfile]# docker port webserver
80/tcp -> 192.168.100.46:32771
|
Docker NAT iptables实现 默认情况下,容器可以主动访问到外部网络的连接,但是外部网络无法访问到容器
容器访问外部实现 容器所有到外部网络的连接,源地址都会被 NAT 成本地系统的 IP 地址(即docker0地址)。这是使用 iptables 的源地址伪装操作实现的 查看主机的 NAT 规则 1
2
3
4
| [iyunv@localhost sshd_dockerfile]# iptables -t nat -vnL
Chain PREROUTING (policy ACCEPT 3 packets, 234 bytes)
pkts bytes target prot opt in out source destination
242 19323 PREROUTING_direct all -- * * 0.0.0.0/0 0.0.0.0/0
|
外部访问容器实现 容器允许外部访问,可以在 docker run 时候通过 -p 或 -P 参数来启用,不管用那种办法,其实也是在本地的 iptable 的 nat 表中添加相应的规则 使用 -P 时: 1
2
| [iyunv@localhost sshd_dockerfile]# docker run -d -P centos:http
f2f3ca6d96693b2223d4011e770c3d2b8359219f13e5e617f2263a6bc4298f18
|
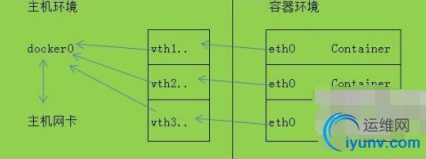
docker0 网桥 Docker服务默认会创建一个 docker0 网桥(其上有一个 docker0 内部接口),它在内核层连通了其他的物理或虚拟网卡,这就将所有容器和本地主机都放到同一个物理网络。 1
2
3
| [iyunv@localhost ~]# brctl show
bridge name bridge id STP enabled interfaces
docker0 8000.02429a3b4e3e no veth3855536
|
注意(brctl可以使用yum install bridge-utils) 容器 1
2
3
| [iyunv@localhost ~]# docker exec -it e0c4edcb03ed /bin/bash
[iyunv@e0c4edcb03ed /]#
[iyunv@e0c4edcb03ed /]# sudo yum -y install iproute
|
进入运行的容器使用exec;之后安装iproute包。 1
2
3
| [iyunv@e0c4edcb03ed /]# ip r
default via 172.17.0.1 dev eth0
172.17.0.0/16 dev eth0 proto kernel scope link src 172.17.0.3
|
会看到容器的ip/默认网关。 Docker 网络配置 Docker 四种网络模式 docker run 创建 Docker 容器时,可以用 --net 选项指定容器的网络模式,Docker 有以下 4 种网络模式: · host 模式,使用 --net=host 指定。 · container 模式,使用 --net=container:NAMEorID 指定。 · none 模式,使用 --net=none 指定。 · bridge 模式,使用 --net=bridge 指定,默认设置。 host 模式 如果启动容器的时候使用 host 模式,那么这个容器将不会获得一个独立的 Network Namespace,而是和宿主机共用一个 Network Namespace。容器将不会虚拟出自己的网卡,配置自己的 IP 等,而是使用宿主机的 IP 和端口。 查看httpd进程 1
| [iyunv@localhost ~]# pgrep httpd
|
启动容器 host模式 1
2
| root@localhost sshd_dockerfile]# docker run -dit --net=host centos:http
b4f57f10bbc3da6aeefaf435613f7832d152d60cd971613e7d8da30b3b5b2c29
|
放行80端口 1
2
| [iyunv@localhost sshd_dockerfile]# firewall-cmd --add-port=80/tcp
success
|

container 模式 这个模式指定新创建的容器和已经存在的一个容器共享一个 Network Namespace,而不是和宿主机共享。新创建的容器不会创建自己的网卡,配置自己的 IP,而是和一个指定的容器共享 IP、端口范围等。同样,两个容器除了网络方面,其他的如文件系统、进程列表等还是隔离的。两个容器的进程可以通过 lo 网卡设备通信。 运行一个容器:查看容器的IP 1
2
| root@localhost sshd_dockerfile]# docker run -it docker.wang.com/centos:centos7
[iyunv@17cd70302107 /]#
|
将容器切换到后台运行:ctrl+p ctrl+q 在运行一个容器使用container模式:查看新容器的地址 docker run -it --ent=container:d86194948685(上个容器id) 镜像名 查看ip,发现与上个容器ip一致。 none模式 这个模式和前两个不同。在这种模式下,Docker 容器拥有自己的 Network Namespace,但是,并不为 Docker容器进行任何网络配置。也就是说,这个 Docker 容器没有网卡、IP、路由等信息。需要我们自己为 Docker 容器添加网卡、配置 IP 等。 1. none模式(容器拥有自己的Network namespace) 需自己为容器添加网卡、配置ip等。 2. bridge模式(docker0网卡、桥接到容器的网卡。) 所有的veth*的接口都会桥接到docker0(虚拟共享网)

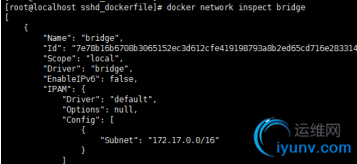
查看桥接网络的详细信息 1
| [iyunv@localhost sshd_dockerfile]# docker network inspect
|

自定义网桥除了默认的 docker0 网桥,用户也可以指定网桥来连接各个容器。在启动 Docker 服务的时候,使用 -b BRIDGE 或 --bridge=BRIDGE 来指定使用的网桥。 Docker 允许你管理 docker0 桥接或者通过-b选项自定义桥接网卡,需要安装bridge-utils软件包。 基本步骤如下: 1.确保 docker 的进程是停止的 2.创建自定义网桥 3.给网桥分配特定的 ip 4.以 -b 的方式指定网桥 如果服务已经运行,那需要先停止服务,并删除旧的网桥 1
2
3
4
5
6
| [iyunv@localhost sshd_dockerfile]# systemctl stop docker
[iyunv@localhost sshd_dockerfile]# ip link set dev docker0 down
[iyunv@localhost sshd_dockerfile]# brctl delbr docker0
[iyunv@localhost sshd_dockerfile]# brctl show
bridge name bridge id STP enabled interfaces
virbr0 8000.000000000000 yes
|
1. 创建网桥,分配ip。 1
2
3
| [iyunv@localhost sshd_dockerfile]# brctl addbr bridge0
[iyunv@localhost sshd_dockerfile]# ip addr add 192.168.1.1/24 dev bridge0
[iyunv@localhost sshd_dockerfile]# ip link set dev bridge0 up
|
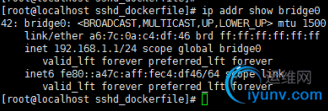
查看确认网桥成功与否 1
2
3
4
| [iyunv@localhost sshd_dockerfile]# brctl show
bridge name bridge id STP enabled interfaces
bridge0 8000.000000000000 no
virbr0 8000.000000000000 yes
|

1. 修改/etc/sysconfig/docker文件。

1. 启动服务。 1
| [iyunv@localhost sshd_dockerfile]# systemctl start docker
|
1. 新建容器。

1. 进入容器查看。 1
2
3
4
| [iyunv@localhost sshd_dockerfile]# docker attach 1481b536c081462aade6e8c7b590142057e6fb29a649011a983672044ea8b609
[iyunv@1481b536c081 /]# yum -y install iproute
[iyunv@localhost sshd_dockerfile]# 'rpm' -qf `which ifconfig`
net-tools-2.0-0.17.20131004git.el7.x86_64
|
查询下ifconfig命令所需软件包 1
| [iyunv@1481b536c081 /]# yum -y install net-tools
|

|