硬件级别
操作系统和硬件级别的优化着眼点:
1、对于CPU密集型的应用场景要使用更快速度的CPU甚至更多数量的CPU,为有着更多查询的场景使用更多的CPU等。基于多核以及超线程(hyperthreading)技术,现代的CPU架构越来越复杂、性能也越来越强了,但MySQL对多CPU架构的并行计算能力的利用仍然是有着不太尽如人意之处,尤其是较老的版本如MySQL 5.1之前的版本甚至无法发挥多CPU的优势。不过,通常需要实现的CPU性能提升目标有两类:低迟延和高吞吐量。低延迟需要更快速度的CPU,因为单个查询只能使用一颗;而需要同时运行许多查询的场景,多CPU更能提供更好的吞吐能力,然而其能否奏效还依赖于实际工作场景,因为MySQL尚不能高效的运行于多CPU,并且其对CPU数量的支持也有着限制。一般来说,较新的版本可以支持16至24颗CPU甚至更多。
2、是否有着合适大小的物理内存,并通过合理的配置平衡内存和磁盘资源,降低甚至避免磁盘I/O。现代的程序设计为提高性能通常都会基于局部性原理使用到缓存技术,这对于频繁操作数据的数据库系统来说尤其如此——有着良好设计的数据库缓存通常比针对通用任务的操作系统的缓存效率更高。缓存可以有效地延迟写入、优化写入,但并能消除写入,并综合考虑存储空间的可扩展性等,为业务选择合理的外部存储设备也是非常重要的工作。
3、是否选择了合适的网络设备并正确地配置了网络对整体系统系统也有着重大影响。延迟和带宽是网络连接的限制性因素,而常见的网络问题如丢包等,即是很小的丢包率也会赞成性能的显著下降。而更重要的还有按需调整系统中关网络方面的设置,以高效处理大量的连接和小查询。
4、是否基于操作系统选择了适用的文件系统。实际测试表明大部分文件系统的性能都非常接近,因此,为了性能而苦选文件系统并不划算。但考虑到文件系统的修复能力,应该使用日志文件系统如ext3、ext4、XFS等。同时,关闭文件系统的某些特性如访问时间和预读行为,并选择合理的磁盘调度器通常都会给性能提升带来帮助。
5、MySQL为响应每个用户连接使用一个单独的线程,再加内部使用的线程、特殊目的线程以及其它任何由存储引擎创建的线程等,MySQL需要对这些大量线程进行有效管理。Linux系统上的NPTL线程库更为轻量级也更有效率。MySQL 5.5引入了线程池插件,但其效用尚不明朗。
来源:网络
OS级别
优化脚本(针对Centos 6.x)
1
2
3
4
5
6
7
8
9
10
11
12
13
14
15
16
17
18
19
20
21
22
23
24
25
26
27
28
29
30
31
32
33
34
35
36
37
38
39
40
41
42
43
44
45
46
47
48
49
50
51
52
53
54
55
56
57
58
59
60
61
62
63
64
65
66
67
68
69
70
71
72
73
74
75
76
77
78
79
80
81
82
83
84
85
86
87
88
89
90
91
92
93
94
95
96
97
98
99
100
101
102
103
104
105
106
107
108
109
110
111
112
113
114
115
116
117
118
119
120
121
122
123
124
125
126
127
128
129
130
131
132
| #!/bin/bash
# Authotby:Tommy.Gandolf
#
# Add SwapFile
Mem=$(free -m |awk '/Mem:/{print $2}')
Swap=$(free -m |awk '/Swap:/{print $2}')
if ["$Swap" == 0 ]; then
if [ $Mem -le 1024 ]; then
dd if=/dev/zero of=/swapfilecount=1024 bs=1M
mkswap /swapfile
swapon /swapfile
chmod 600 /swapfile
elif [ $Mem -gt 1024 -a $Mem -le 2048]; then
dd if=/dev/zero of=/swapfilecount=2048 bs=1M
mkswap /swapfile
swapon /swapfile
chmod 600 /swapfile
fi
cat >>/etc/fstab << EOF
/swapfile swap swap defaults 0 0
EOF
fi
# Install neededpackages
for Package in gccgcc-c++ make cmake autoconf libjpeg libjpeg-devel libpng libpng-devel freetypefreetype-devel libxml2 libxml2-devel zlib zlib-devel glibc glibc-devel glib2glib2-devel bzip2 bzip2-devel ncurses ncurses-devel libaio curl curl-devele2fsprogs e2fsprogs-devel krb5-devel libidn libidn-devel openssl openssl-devellibxslt-devel libevent-devel libtool libtool-ltdl bison gd-devel vim-enhancedpcre-devel zip unzip ntpdate sysstat patch bc expect rsync git
do
yum -y install $Package
done
yum -y update bashopenssl glibc
if [ -n "`gcc--version | head -n1 | grep '4.4'`" ]; then
yum install gcc44 gcc44-c++libstdc++44-devel
export CC="gcc44"CXX="g++44"
fi
# Close AndRemoved Services
for Service in `chkconfig--list | grep 3:on | awk '{print $1}'`;do chkconfig --level 3 $Service off;done
for Service insshd network crond iptables messagebus irqbalance syslog rsyslog; do chkconfig--level 3 $Service on; done
# Colse SELINUX
sed -i's/SELINUX=enforcing/SELINUX=disabled/g' /etc/selinux/config
#Modify PS1
export PS1='\[\033[0;31m\]\342\224\214\342\224\200$([[ $? != 0 ]] &&echo"[\[\033[0;31m\]\342\234\227\[\033[0;37m\]]\342\224\200")[\[\033[01;31m\]root\[\033[01;33m\]@\[\033[01;96m\]\h\[\033[0;31m\]]\342\224\200[\[\033[0;32m\]\w\[\033[0;31m\]]\n\[\033[0;31m\]\342\224\224\342\224\200\342\224\200\342\225\274\[\033[0m\]\[\e[01;33m\]\$\[\e[0m\]'
# history size
sed -i's/^HISTSIZE=.*$/HISTSIZE=100/' /etc/profile
# Descriptor fileSymbol
ulimit -SHn 65535
echo '* - nofile 65535' >>/etc/security/limits.conf
echo 'ulimit -SHn 65535' >> /etc/rc.local
echo 'ulimit -s 65535' >> /etc/rc.local
# Update systemtime_zone
yum install lrzzsntpdate sysstat -y
echo '*/5 * * * *root /usr/sbin/ntpdate time.windows.com > /dev/null 2>&1' >>/var/spool/cron/root
echo '*/10 * * * *root /usr/sbin/ntpdate time.nist.gov > /dev/null 2>&1' >>/var/spool/cron/root
# Cchange defaultsshd port
sed -i '/#Port22/s/#Port 22/Port 65535/' /etc/ssh/sshd_config
#sed -i '/#PermitRootLoginyes/s/#PermitRootLogin yes/PermitRootLogin no/' /etc/ssh/sshd_config
sed -i'/#PermitEmptyPasswords no/s/#PermitEmptyPasswords no/PermitEmptyPasswords no/'/etc/ssh/sshd_config
sed -i '/#UseDNSyes/s/#UseDNS yes/UseDNS no/' /etc/ssh/sshd_config
service sshdrestart
# User add sudopower
/usr/sbin/useradd adminroot
echo'1q2w3e4r' | passwd --stdin adminroot && history -c
sed -i'108a\leerwjamesmengroot ALL=(ALL) NOPASSWD: ALL'/etc/sudoers
# Empty iptablesrules
echo '*/5 * * * *root /etc/init.d/iptables stop' >>/etc/crontab
/etc/init.d/crond restart
iptables -F -t nat
iptables -X
iptables -P INPUTDROP
iptables -P OUTPUTACCEPT
iptables -PFORWARD ACCEPT
modprobeiptable_nat
modprobe ip_conntrack_ftp
modprobeip_nat_ftp
iptables -A INPUT-i lo -j ACCEPT
iptables -A OUTPUT-o lo -j ACCEPT
iptables -A INPUT-m state --state ESTABLISHED,RELATED -j ACCEPT
iptables -A INPUT-m state --state NEW -m tcp -p tcp --dport 22 -j ACCEPT
iptables -A INPUT-m state --state NEW -m tcp -p tcp --dport 80 -j ACCEPT
iptables -A INPUT-m state --state NEW -m tcp -p tcp --dport 65535 -j ACCEPT
iptables -Nsynflood
iptables -Asynflood -m limit --limit 10/s --limit-burst 100 -j RETURN
iptables -Asynflood -p tcp -j REJECT --reject-with tcp-reset
iptables -A INPUT-p tcp -m state --state NEW -j synflood
iptables -A INPUT-p icmp --icmp-type echo-request -m limit --limit 1/s --limit-burst 5 -j ACCEPT
iptables -A INPUT-p icmp --icmp-type echo-request -j DROP
service iptablessave
service iptablesrestart
# Lock file systemimpotant
chattr +i/etc/passwd
chattr +i/etc/inittab
chattr +i/etc/group
chattr +i/etc/shadow
chattr +i/etc/gshadow
# Rename chattrword
mv /usr/bin/chattr/usr/bin/mvchattr
# Hide systemversion information
:>/etc/redhat-release
:> /etc/issue
# Optimize thekernel parameters
cat >>/etc/sysctl.conf <<EOF
net.ipv4.tcp_fin_timeout= 2
net.ipv4.tcp_tw_reuse= 1
net.ipv4.tcp_tw_recycle= 1
net.ipv4.tcp_syncookies= 1
net.ipv4.tcp_keepalive_time=600
net.ipv4.ip_local_port_range= 4000 65000
net.ipv4.tcp_max_syn_backlog= 16384
net.ipv4.tcp_max_tw_buckets= 36000
net.ipv4.route.gc_timeout= 100
net.ipv4.tcp_syn_retries= 1
net.ipv4.tcp_synack_retries= 1
net.core.somaxconn= 16384
net.core.netdev_max_backlog= 16384
net.ipv4.tcp_max_orphans= 16384
EOF
sysctl -p
echo "SystemSecurity init OK"
echo "InitSystem OK.... "
|
MySQL级别
安装优化
使用jemalloc内存管理替代操作系统本身的内存管理机制 1
2
3
4
5
6
7
8
9
10
11
12
13
14
15
16
17
18
19
20
21
22
23
24
25
26
27
28
29
30
31
32
| tar jxvfjemalloc-3.4.0.tar.bz2
cd jemalloc-3.4.0
./configure
make && makeinstall
echo'/usr/local/lib' >> /etc/ld.so.conf.d/local.conf
ldconfig -v > /dev/null 2>&1
groupadd -r mysql
useradd -g mysql -r -s /sbin/nologin -M mysql
tar zxvfmysql-5.5.43.tar.gz
cd mysql-5.5.43
cmake . -DCMAKE_INSTALL_PREFIX=/usr/local/mysql\
-DMYSQL_DATADIR=/data/mydata\
-DSYSCONFDIR=/etc\
-DWITH_INNOBASE_STORAGE_ENGINE=1\
-DWITH_PARTITION_STORAGE_ENGINE=1\
-DWITH_FEDERATED_STORAGE_ENGINE=1\
-DWITH_BLACKHOLE_STORAGE_ENGINE=1\
-DWITH_MYISAM_STORAGE_ENGINE=1\
-DWITH_ARCHIVE_STORAGE_ENGINE=1\
-DWITH_READLINE=1\
-DENABLED_LOCAL_INFILE=1\
-DENABLE_DTRACE=0\
-DDEFAULT_CHARSET=utf8\
-DDEFAULT_COLLATION=utf8_general_ci\
-DWITH_EMBEDDED_SERVER=1\
-DCMAKE_EXE_LINKER_FLAGS='-ljemalloc' \
-DWITH_SAFEMALLOC=OFF
make -j `grepprocessor /proc/cpuinfo | wc -l`
make install
sed -i's@executing mysqld_safe@executing mysqld_safe\nexportLD_PRELOAD=/usr/local/lib/libjemalloc.so@' $MYSQL_INSTALL_DIR/bin/mysqld_safe
# lsof -n | grepjemalloc
|

配置优化
1
2
3
4
5
6
7
8
9
10
11
12
13
14
15
16
17
18
19
20
21
22
23
24
25
26
27
28
29
30
31
32
33
34
35
36
37
38
39
40
41
42
43
44
45
46
47
48
49
50
51
52
53
54
55
56
57
58
59
60
61
62
63
64
65
66
67
68
69
70
71
72
73
74
75
76
77
78
79
80
81
82
83
84
85
86
87
88
89
90
91
92
| cat >/etc/my.cnf << EOF
[client]
port = 3306
socket =/tmp/mysql.sock
[mysqld]
port = 3306
socket =/tmp/mysql.sock
basedir =/usr/local/mysql
datadir =/data/mydata
pid-file =/data/mydata/mysql.pid
user = mysql
bind-address =0.0.0.0
server-id = 1
skip-name-resolve
#skip-networking
back_log = 300
max_connections =1000
max_connect_errors= 6000
open_files_limit =65535
table_open_cache =128
max_allowed_packet= 4M
binlog_cache_size= 1M
max_heap_table_size= 8M
tmp_table_size =16M
read_buffer_size =2M
read_rnd_buffer_size= 8M
sort_buffer_size =8M
join_buffer_size =8M
key_buffer_size =4M
thread_cache_size= 8
query_cache_type =1
query_cache_size =8M
query_cache_limit= 2M
ft_min_word_len =4
log_bin =mysql-bin
binlog_format =mixed
expire_logs_days =30
log_error =/data/mydata/mysql-error.log
slow_query_log = 1
long_query_time =1
slow_query_log_file= /data/mydata/mysql-slow.log
performance_schema= 0
#lower_case_table_names= 1
skip-external-locking
default_storage_engine= InnoDB
#default-storage-engine= MyISAM
innodb_file_per_table= 1
innodb_open_files= 500
innodb_buffer_pool_size= 64M
innodb_write_io_threads= 4
innodb_read_io_threads= 4
innodb_thread_concurrency= 0
innodb_purge_threads= 1
innodb_flush_log_at_trx_commit= 2
innodb_log_buffer_size= 2M
innodb_log_file_size= 32M
innodb_log_files_in_group= 3
innodb_max_dirty_pages_pct= 90
innodb_lock_wait_timeout= 120
bulk_insert_buffer_size= 8M
myisam_sort_buffer_size= 8M
myisam_max_sort_file_size= 10G
myisam_repair_threads= 1
interactive_timeout= 28800
wait_timeout =28800
[mysqldump]
quick
max_allowed_packet= 16M
[myisamchk]
key_buffer_size =8M
sort_buffer_size =8M
read_buffer = 4M
write_buffer = 4M
EOF
|
依据内存调整配置参数
脚本内容如下:
1
2
3
4
5
6
7
8
9
10
11
12
13
14
15
16
17
18
19
20
21
22
23
24
25
26
27
| #!/bin/bash
# Author by:Tommy.Gandolf
#
Memtatol=`free -m| grep 'Mem:' | awk '{print $2}'`
if [ $Memtatol -gt1500 -a $Memtatol -le 2500 ];then
sed -i's@^thread_cache_size.*@thread_cache_size = 16@' /etc/my.cnf
sed -i's@^query_cache_size.*@query_cache_size = 16M@' /etc/my.cnf
sed -i's@^myisam_sort_buffer_size.*@myisam_sort_buffer_size = 16M@' /etc/my.cnf
sed -i's@^key_buffer_size.*@key_buffer_size = 16M@' /etc/my.cnf
sed -i's@^innodb_buffer_pool_size.*@innodb_buffer_pool_size = 128M@' /etc/my.cnf
sed -i 's@^tmp_table_size.*@tmp_table_size= 32M@' /etc/my.cnf
sed -i's@^table_open_cache.*@table_open_cache = 256@' /etc/my.cnf
elif [ $Memtatol-gt 2500 -a $Memtatol -le 3500 ];then
sed -i's@^thread_cache_size.*@thread_cache_size = 32@' /etc/my.cnf
sed -i's@^query_cache_size.*@query_cache_size = 32M@' /etc/my.cnf
sed -i's@^myisam_sort_buffer_size.*@myisam_sort_buffer_size = 32M@' /etc/my.cnf
elif [ $Memtatol-gt 3500 ];then
sed -i 's@^thread_cache_size.*@thread_cache_size= 64@' /etc/my.cnf
sed -i's@^query_cache_size.*@query_cache_size = 64M@' /etc/my.cnf
sed -i's@^myisam_sort_buffer_size.*@myisam_sort_buffer_size = 64M@' /etc/my.cnf
sed -i's@^key_buffer_size.*@key_buffer_size = 256M@' /etc/my.cnf
sed -i's@^innodb_buffer_pool_size.*@innodb_buffer_pool_size = 1024M@' /etc/my.cnf
sed -i's@^tmp_table_size.*@tmp_table_size = 128M@' /etc/my.cnf
sed -i's@^table_open_cache.*@table_open_cache = 1024@' /etc/my.cnf
fi
echo " "
|
安全优化 1
2
3
4
5
6
7
8
9
10
11
12
13
| #!/bin/bash
# Author by:Tommy.Gandolf
#
MYSQL_INSTALL_DIR=/usr/local/mysql
DBPASSWD=123456
$MYSQL_INSTALL_DIR/bin/mysql-e "grant all privileges on *.* to root@'127.0.0.1' identified by \"DBPASSWD\"with grant option;"
$MYSQL_INSTALL_DIR/bin/mysql-e "grant all privileges on *.* to root@'localhost' identified by \"DBPASSWD\"with grant option;"
$MYSQL_INSTALL_DIR/bin/mysql-uroot -pDBPASSWD -e "delete from mysql.user where Password='';"
$MYSQL_INSTALL_DIR/bin/mysql-uroot -pDBPASSWD -e "delete from mysql.db where User='';"
$MYSQL_INSTALL_DIR/bin/mysql-uroot -pDBPASSWD -e "delete from mysql.proxies_priv whereHost!='localhost';"
$MYSQL_INSTALL_DIR/bin/mysql-uroot -pDBPASSWD -e "drop database test;"
$MYSQL_INSTALL_DIR/bin/mysql-uroot -pDBPASSWD -e "reset master;"
echo “ ”
|
MySQL5.5新特性调整
MySQL5.1之前innodb的格式是Antelope。MySQL5.5 的innodb插件的格式调整为Barracuda,支持表压缩功能,TRUNCATE TABLE速度更快。
官方innodb参数如下:
1
2
3
4
5
6
7
8
9
10
11
12
13
14
15
16
17
18
19
20
21
22
| innodb_purge_threads=1
innodb_file_format=barracuda
innodb-buffer-pool-size=8192M
innodb_support_xa=FALSE
innodb_flush_method=O_DIRECT
innodb-flush-log-at-trx-commit=2
innodb-log-file-size=2000M
innodb-log-buffer-size=64M
innodb-io-capacity=200
skip-innodb-adaptive-hash-index
innodb-read-io-threads=8
innodb-write-io-threads=8
innodb_change_buffering=all
innodb_stats_on_metadata=off
innodb-buffer-pool-instances=12
skip-grant-tables
max_tmp_tables=100
query_cache_size=0
query_cache_type=0
max_connections=1000
max_prepared_stmt_count=1048576
sort_buffer_size=32768
|
利用CPU的多核处理功能
1
2
| innodb_read_io_threads= 8
innodb_write_io_threads= 8
|
提高刷新脏页数量和合并插入数量,改善磁盘IO处理能力1
| SET GLOBAL innodb_io_capacity = 2000;
|
参考如下:
innodb_io_capacity磁盘配置
200 单盘SAS/SATA
2000 SAS*12 RAID10
5000 SSD
50000 FUSION-IO
增加了自适应刷新脏页功能1
| innodb_adaptive_flushing
|
加快了InnoDB的数据恢复时间1
2
3
4
5
6
7
| innodb_log_file_size= 300M
innodb_log_files_in_group= 3
innodb_log_buffer_size= 16M
innodb_max_dirty_pages_pct= 75
innodb_force_recovery= 0
innodb_buffer_pool_size= 600M
innodb_flush_log_at_trx_commit= 0
|
INNODB 同时支持多个BufferPool实例1
| innodb_buffer_pool_instances= 3
|
提高了默认innodb线程并发数1
| innodb_thread_concurrency= 0
|
改善清除程序进度1
| innodb_purge_batch_size=5000
|
添加了删除缓冲和清除缓冲1
| SET GLOBALinnodb_change_buffering = all;
|
控制自旋锁Spin Lock轮训间隔1
| set globalinnodb_spin_wait_delay=6;
|
InnoDB支持创建压缩数据页1
2
| innodb_file_format= Barracuda
innodb_file_per_table= 1
|
在建表的时候加入ROW_FORMAT=COMPRESSED KEY_BLOCK_SIZE=8 即可,如:
1
2
3
4
5
6
7
8
9
10
11
12
| CREATE TABLE`compressed` (
`id` int(10)unsigned NOT NULL AUTO_INCREMENT,
37 / 65
`k` int(10)unsigned NOT NULL DEFAULT '0',
`c` char(120) NOTNULL DEFAULT '',
`pad` char(60) NOTNULL DEFAULT '',
PRIMARY KEY(`id`),
KEY `k` (`k`)
) ENGINE=InnoDB
DEFAULTCHARSET=gbk
ROW_FORMAT=COMPRESSED
KEY_BLOCK_SIZE=8
|
可动态关闭InnoDB更新元数据统计功能1
| set globalinnodb_stats_on_metadata = OFF;
|
中继日志relay-log自我修复1
| relay_log_recovery= 1(在slave上设置)
|
开启InnoDB严格检查模式1
| set globalinnodb_strict_mode=1;
|
支持动态更改InnoDB锁超时时间1
| set globalinnodb_lock_wait_timeout = 10;
|
show status\G;工具优化
1.慢查询showvariables like ‘slow%’; #查看是否开启了慢查询,以及慢查询的日志文件

Show global statuslike ‘slow%’; #查看mysql的慢查询运行状态信息

配置中打开了记录慢查询,执行时间超过2秒的即为慢查询,如果slow_queries显示为4148,那么,系统显示有4148个慢查询,你可以分析慢查询日志,找出有问题的sql语句,慢查询时间不宜设置过长,否则意义不大,最好在5秒以内,如果你需要微秒级别的慢查询,可以考虑给mysql打补丁:http://www.percona.com /docs/wiki/release:start,记得找对应的版本。
打开慢查询日志可能会对系统性能有一点点影响,如果你的mysql是主-从结构,可以考虑打开其中一台从服务器的慢查询日志,这样既可以监控慢查询,对系统性能影响又小
2.连接数经常会遇见”mysql:error 1040: too many connections”的情况,一种是访问量确实很高,mysql服务器抗不住,这个时候就要考虑增加从服务器分散读压力,另外一种情况是mysql配 置文件中max_connections值过小:

连接mysql的最大连接数是151,然后查询一下服务器响应的最大连接数
Show global statuslike ‘max_used_connections’;

Mysql过去的最大连接数是19个,并没有达到151的上限,应该是不会出现1404的错误设置,最合理的设置:
1
| <span style="font-family:'微软雅黑', 'Microsoft YaHei';font-size:14px;">max_used_connections / max_connections * 100% = 85%<br></span>
|
最大连接数占上限数的85%左右,如果发现比列在10%一下,如果在10%一下,mysql的连接数设置过高了。
这里的计算:19/max_connections*100%=85% max_connections=23才对
如果按照这里的151计算: 19/151 * 100% = 12.5% 不算高
3.key_buffer_size
key_buffer_size是对myisam表性能影响最大的一个参数
show variableslike ‘key_buffer_size’;
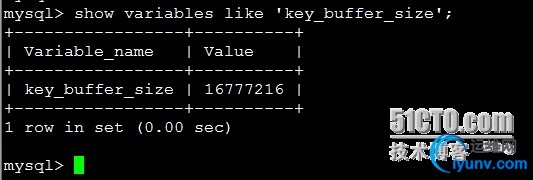
这里看得出来,key_buffer_size分配了16M的内存大小,我们再查询下key_buffer_size的内存使用情况:
1
| show global statuslike ‘key_read%’;
|

一共有110236个索引读取请求,有2720个请求在内存中没有找到,直接从硬盘服务器硬盘读取索引,计算索引为命中的概率为:
Key_cache_miss_rate= key_reads / key_read_requests * 100%
Key_cache_miss_rate= 2720/ 110236 * 100%=2.4%
比如上面的数据,key_cache_miss_rate为2.4%,如果key_cache_miss_rate在 0.01%以下的话,key_buffer_size分配的过多,可以适当减少
Mysql的服务器还提供了key_blocks_* 的参数:
1
| Show global statuslike ‘key_blocks_u%’;
|

key_blocks_unused 表示未使用的缓存簇(blocks)数,key_blocks_used表示曾经用到的最大的blocks数,比如这台服务器,所有的缓存都用到了,要么 增加key_buffer_size,要么就是过渡索引了,把缓存占满了。比较理想的设置:
key_blocks_ued / (key_blocks_unused + key_blocks_used) * 100%=80%
这里计算的结果:58/(13374 + 58)= 0.43%
4.临时表1
| Show global statuslike ‘create_tmp%’;
|

每次创建临时表,created_tmp_tables增加,如果是在磁盘上创建临时表,created_tmp_disk_tables也增加,created_tmp_files表示mysql服务创建的临时文件文件数,比较理想的配置是:
created_tmp_disk_tables/ created_tmp_tables * 100% <= 25%比如上面的服务器created_tmp_disk_tables /created_tmp_tables * 100% = 60%,就需要优化了。我们再看一下mysql服务器对临时表的配置:
1
| show variableswhere variable_name in (‘tmp_table_size’,’max_heap_table_size’);
|

只有256mb以下的临时表才能全部放内存,超过的就会用到硬盘临时表
5.open table 情况1
| Show globalstatuslike ‘open%tables%’;
|
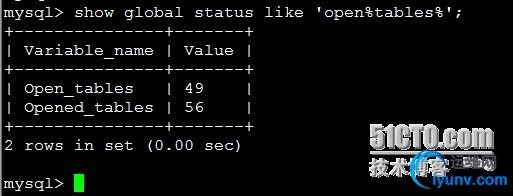
open_tables表示打开表的数量,opened_tables表示打开过的表数量,如果opened_tables数量过大,说明配置中 table_cache(5.1.3之后这个值叫做table_open_cache)值可能太小,我们查询一下服务器table_cache值:
1
| show variableslike 'table_open_cache';
|

比较合适的设置为:
Open_tables /opend_tables * 100% >= 85%
Open_tables /tables_cache * 100%>= 95%
这里的值分别计算为:87% 和76%
6.进程使用情况1
| Show global statuslike ‘thread%’;
|
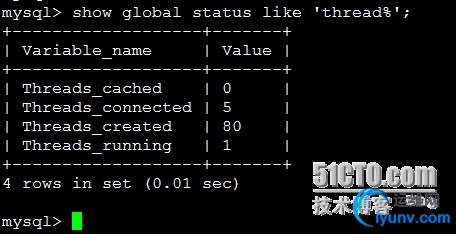
如果我们在mysql服务器配置文件中设置了thread_cache_size,当客户端断开之后,服务器处理此客户的线程将会缓存起来以响应下一个客 户而不是销毁(前提是缓存数未达上限)。threads_created表示创建过的线程数,如果发现threads_created值过大的话,表明mysql服务器一直在创建线程,这也是比较耗资源,可以适当增加配置文件中thread_cache_size值,查询服务器 thread_cache_size配置:
1
| Show variableslike ‘thread_cache_size’;
|

7.查询缓存(query cache)1
| Show global statuslike ‘qcache%’;
|
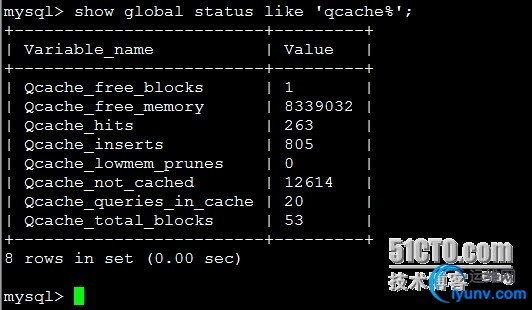
mysql查询缓存变量解释:
qcache_free_blocks:缓存中相邻内存块的个数。数目大说明可能有碎片。flush query cache会对缓存中的碎片进行整理,从而得到一个空闲块。
qcache_free_memory:缓存中的空闲内存。
qcache_hits:每次查询在缓存中命中时就增大
qcache_inserts:每次插入一个查询时就增大。命中次数除以插入次数就是不中比率。
qcache_lowmem_prunes: 缓存出现内存不足并且必须要进行清理以便为更多查询提供空间的次数。这个数字最好长时间来看;如果这个数字在不断增长,就表示可能碎片非常严重,或者内存 很少。(上面的free_blocks和free_memory可以告诉您属于哪种情况)
qcache_not_cached:不适合进行缓存的查询的数量,通常是由于这些查询不是 select 语句或者用了now()之类的函数。
qcache_queries_in_cache:当前缓存的查询(和响应)的数量。
qcache_total_blocks:缓存中块的数量。
在查询下服务器关于query_cache的配置
1
| show variables like 'query_cache%';
|
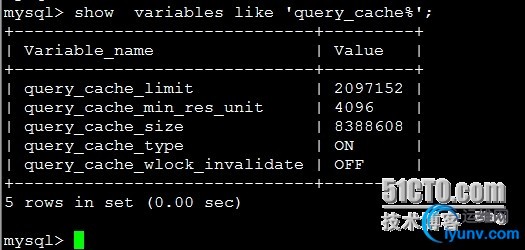
各字段的解释:
query_cache_limit:超过此大小的查询将不缓存
query_cache_min_res_unit:缓存块的最小大小
query_cache_size:查询缓存大小
query_cache_type:缓存类型,决定缓存什么样的查询,示例中表示不缓存 select sql_no_cache 查询
query_cache_wlock_invalidate:当有其他客户端正在对myisam表进行写操作时,如果查询在query cache中,是否返回cache结果还是等写操作完成再读表获取结果。
query_cache_min_res_unit的配置是一柄”双刃剑”,默认是4kb,设置值大对大数据查询有好处,但如果你的查询都是小数据查询,就容易造成内存碎片和浪费。
查询缓存碎片率 = qcache_free_blocks / qcache_total_blocks * 100%
如果查询缓存碎片率超过20%,可以用flush query cache整理缓存碎片,或者试试减小query_cache_min_res_unit,如果你的查询都是小数据量的话。
查询缓存利用率 =(query_cache_size - qcache_free_memory) / query_cache_size * 100%
查询缓存利用率在25%以下的话说明query_cache_size设置的过大,可适当减小;查询缓存利用率在80%以上而且qcache_lowmem_prunes > 50的话说明query_cache_size可能有点小,要不就是碎片太多。
查询缓存命中率 =(qcache_hits - qcache_inserts) / qcache_hits * 100%
示例服务器 查询缓存碎片率 = 1.8%,查询缓存利用率 = 0.6%,查询缓存命中率 = 20.6%,命中率很差,可能写操作比较频繁吧,而且可能有些碎片
8.排序使用情况1
| Show global statuslike ‘sort%’;
|
sort_merge_passes 包括两步。mysql 首先会尝试在内存中做排序,使用的内存大小由系统变量 sort_buffer_size 决定,如果它的大小不够把所有的记录都读到内存中,mysql 就会把每次在内存中排序的结果存到临时文件中,等 mysql 找到所有记录之后,再把临时文件中的记录做一次排序。这再次排序就会增加 sort_merge_passes。实际上,mysql 会用另一个临时文件来存再次排序的结果,所以通常会看到 sort_merge_passes 增加的数值是建临时文件数的两倍。因为用到了临时文件,所以速度可能会比较慢,增加 sort_buffer_size 会减少 sort_merge_passes 和 创建临时文件的次数。但盲目的增加 sort_buffer_size 并不一定能提高速度
9.文件打开数1
| Show globalstatus like ‘open_files%’;
|
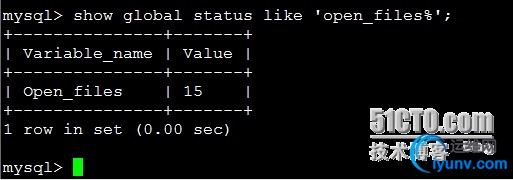
1
| show variables like 'open_files_limit';
|
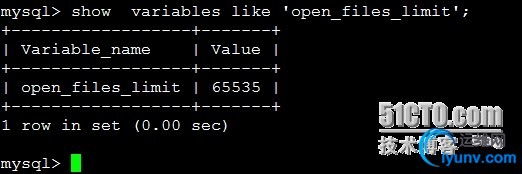
比较合适的设置:open_files/ open_files_limit * 100% <= 75%
10.表锁情况1
| Show global statuslike ‘table_locks%’;
|

table_locks_immediate表示立即释放表锁数,table_locks_waited表示需要等待的表锁数,如果 table_locks_immediate / table_locks_waited> 5000,最好采用innodb引擎,因为innodb是行锁而myisam是表锁,对于高并发写入的应用innodb效果会好些。示例中的服务器 table_locks_immediate / table_locks_waited = 235,myisam就足够了。
11.表扫描情况1
| Show global statuslike ‘handler_read%’;
|
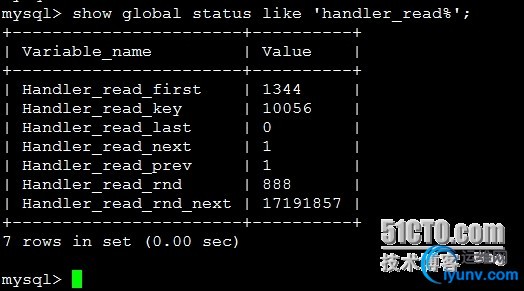
Handler_read_first此选项表明SQL是在做一个全索引扫描,注意是全部,而不是部分,所以说如果存在WHERE语句,这个选项是不会变的。如果这个选项的数值很大,既是好事 也是坏事。说它好是因为毕竟查询是在索引里完成的,而不是数据文件里,说它坏是因为大数据量时,简便是索引文件,做一次完整的扫描也是很费时的
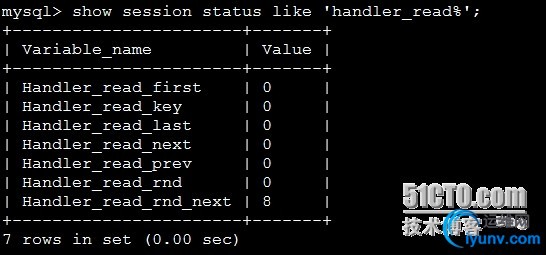
Handler_read_key此选项数值如果很高,那么恭喜你,你的系统高效的使用了索引,一切运转良好

Handler_read_next此选项表明在进行索引扫描时,按照索引从数据文件里取数据的次数
Handler_read_prev此选项表明在进行索引扫描时,按照索引倒序从数据文件里取数据的次数,一般就是ORDER BY ... DESC
Handler_read_rnd简单的说,就是查询直接操作了数据文件,很多时候表现为没有使用索引或者文件排序
Handler_read_rnd_next此选项表明在进行数据文件扫描时,从数据文件里取数据的次数
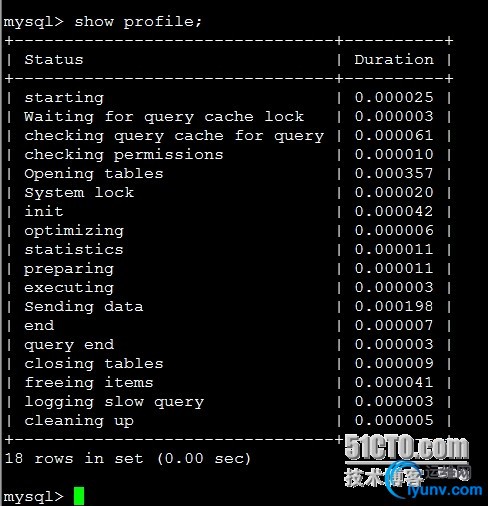
说到判断查询方式优劣这个问题,就再顺便提提show profile语法,在新版MySQL里提供了这个功能:
Set profiling=on;
Show profile;

调出服务器完成的查询请求次数:
1
| Show globalstatus like ‘com_select’;
|

计算表扫描率:
表扫描率 = handler_read_rnd_next / com_select
如果表扫描率超过4000,说明进行了太多表扫描,很有可能索引没有建好,增加read_buffer_size值会有一些好处,但最好不要超过8mb
|